This post was entirely written by me, Jasmine, and it details some of the decisions I had to make while editing!
Editing and post production:
Filming Hardware:

I decided to film the music video entirely using my Fujifilm Xt30ii camera as that would give us the best quality of video, also making it more cinematic. However, one of the biggest issues was that I had to be there all the time as the camera was mine and every time we filmed, I had to be there and bringing the equipment to school was also very heavy and was a bit hassling when some of my teammates would cancel the filming session suddenly. My battery would also run out quite quickly, which is why I initially bought a spare battery, however, I got scammed and the battery did not work when it arrived to me. It also took a long time to export the pictures and videos to my iPad at times. In hindsight, it might’ve been easier to record using our phones instead.
Editing Software:

To begin with, I decided to use DaVinci Resolve as my editing program as I had heard many good reviews about it, being new to the editing scene! I had also learned that this program had a clip-stabilizing feature which was what I really needed since at some points of the filming process, I didn’t use a tripod which meant that most of my clips were shaky to some degree, the stabilizer would help me with that issue. I had also heard that it was more user friendly compared to some of the other famous editing softwares such as Adobe. In addition, it was actually my second choice as I had initially planned to use CapCut, however, referencing my Multicam media mini-project, that software was very laggy and impacted the final product, therefore, to avoid that I decided to choose a different software. I had also researched and saw that DaVinci’s color grading feature was also top-notch and most of its tools were available for free, which is just what I needed for this project!
Editing Hardware:

I decided to use my iPad Pro (12.9-inch) (6th generation)! The reason why I decided to use this hardware instead of my laptop was dependent on some factors. The first factor was that the clips from all the filming we did were exported to my iPad via the Fujifilm app, therefore, it would be easiest to edit on my iPad since I wouldn’t have to go through the hassle of exporting the clips a second time to my laptop. Secondly, I use my iPad on a day-to-day basis and it is very easily transportable. Therefore, it would give me as much access to video editing as possible every day, and it would be quick to check on my progress on editing often for my fellow teammates. I was also able to bring my iPad to most of the filming sessions, which meant that I could work on the editing right after we finished filming, making it more efficient.
Post-production:
Here is the overall interface and timeline of our music video in DaVinci Resolve.

Initially, I did have a bunch of issues while using the software since I was a complete beginner at using it. One of the main issues was that when I was adjusting the length of the clips in the program, it kept on deleting or readjusting the duration of other clips, which confused me a lot because I didn’t understand why it was happening. At many points during editing, I had to keep readjusting the clips to the song again and again because I kept making this mistake. Eventually, I learned from my mistakes and made sure to look at the mini-timeline on top of the main timeline to make sure that I was only adjusting one clip. This is the mini-timeline I’m referring to:
As you can see, I didn’t use anything special like markers because I didn’t know they existed until the end of the project, so it was a bit too late to implement them. I did wish I’d used them earlier because I did have a hard time matching the cuts and clips to the beat of the song. I also wasn’t able to use a clapperboard because we didn’t have one, in addition I was acting so I forgot to clap to signify the start of the lipsync since I was so focused on trying to act for the music video, so I did also make a bunch of mistakes which did make it harder for me to edit, and I think it did take longer to edit than I thought it would.
Significant editing tools, skills and processes during post-production:
Fade-in:

https://www.youtube.com/watch?v=tzvNlGXXX5c
I used this video as a tutorial on how to add a fade-in edit to the start of my music video, which my media teacher suggested as in the indie pop genre, fade-ins are very common for the start of a music video. It also eases into the video, so the audience isn’t immediately shocked by the contents of the video.

This is what the timeline looked like once I added the transition, fade-in effect to my video clip. It was very easy to do so I’m glad!
Clip Stabilizing:

https://www.youtube.com/watch?v=X1WG5jc5SU0
I used the video tutorial above to learn how to stabilize a video in DaVinci Resolve. I only found out about this feature halfway through making the music video. Previously, I had always brought my super heavy tripod, making it a hassle. Using this tool removed that issue as I wouldn’t need a tripod for every scene since I could just stabilize it in post-production while recording the scenes hand-held. One issue with stabilising a clip, though, was that it would make the clips more zoomed in as the software had to compensate for stabilizing the movement by shaking the video the opposite way to reduce the movement. It is a bit complicated to explain, but you can see the effect in these two images:


The first image is before stabilizing the video, and the second is after stabilizing, in addition to the pull-out edit that I will also talk about in this post.
Pull-out:
For the pull-out, I actually learned how to do it after playing around with the software a bit. All I had to do was click this button:

Which would pull out the tools view:

Then I selected the icon highlighted above. After doing so, a smaller green box would appear on top of the video clip.

All I had to do was make the green box smaller by dragging the edges inside, which resulted in the pull-out effect shown often throughout the video.
However, there were quite a few issues I encountered while trying to use this effect. The first one being that sometimes, the pull-out would make the clip super zoomed in at the start so that sometimes, parts of the artists body were cut off, therefore I had to often adjust the intensity of the effect to avoid this issue. In addition, sometimes the pull-out effect was way too quick which made it unnatural looking so I also had to adjust that often to make sure that the music video felt “real”.
I think that utilizing the pull-out often throughout the music video helped to convey towards the audience, connoting the separation between the two friends, eventually leading to both Jasmine and Viola studying in different countries. The pull-out effect takes the audience further away from the artists in the music video, conveying the same emotions stated earlier.
Color-grading:
I had initially planned to color grade very professionally using all the tools available in DaVinci Resolve, however due to the nature of our filming being done only so close to the deadline, I was unable to do that and ended up only simply colorgrading a small part of the music video to adjust the lighting or the mood of the scene by tweaking some of the colors.


This is an example of one of the clips I color graded, the left before the colorgrading and the right, after. Although just a slight tweak, I made the scene more cool-toned to contrast the warm tone of the previous scene, a match cut to this one to symbolize that a fight was occurring between the two characters, Jasmine and Viola. This symbolic code (Barthes) would help to give the audience context to the fight occurring as blue or cool toned scenes are often associated with sadness, or unfortunate events while warm tones in the scene earlier would symbolize happiness and love (Binary opposites by Levi Strauss, in this case being happiness vs. sadness). Here is the clip, with warm lighting before this scene to show the contrast between the coloring.

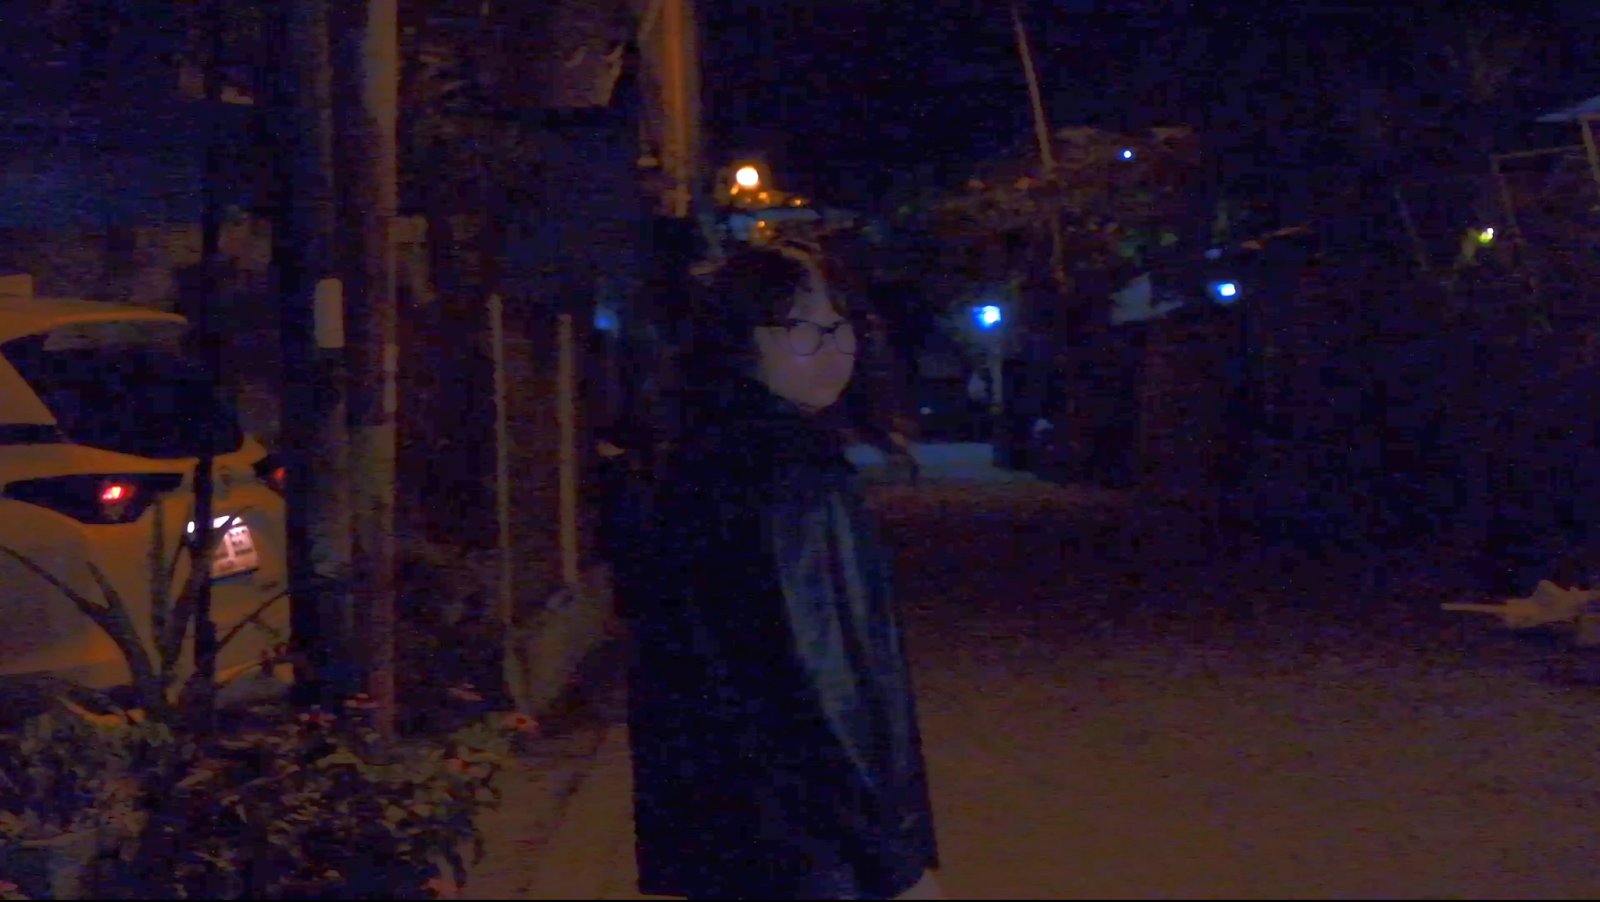
Additionally, for some scenes, the lighting was way too dark, so the audience wouldn’t be able to see what was happening on screen. Here is an example of what I did to fix that issue:


The first image is before the edits, and the second is after the lighting edits. I increased the exposure of the dark setting, making the dark areas of the video brighter. However, in doing so, I made the grain and the bad video quality very noticeable. Even though I already used a ring light, it was still very dark so the clip came out to be very bad quality, which means we will need to record the scene again.

Self-Reflection:
It was actually really challenging to get the hang of using the editing software, DaVinci Resolve, at first; however, after a lot of trial and error, I’ve successfully created a decent music video! There were many times throughout the process where I thought that I wanted to give up because it felt impossible to learn the program, but through watching many YouTube tutorials, I think I was able to pull through. I definitely think that I could’ve used more technical skills such as filters, and all however, I wasn’t able to learn all those skills within the timeframe of the project, however I do think that the lack of filters makes the music video seem more realistic and relatable so in the end, I believe it all worked out in the end. For the parts filmed in dark settings, they were mostly fight or sad scenes, therefore there was natural noise and grain from the camera’s high ISO, however this was a good thing since I didn’t need to add on any filters since the noise connotes uneasiness or the blur of thoughts due to strong emotions of anger or sadness.
No comments:
Post a Comment